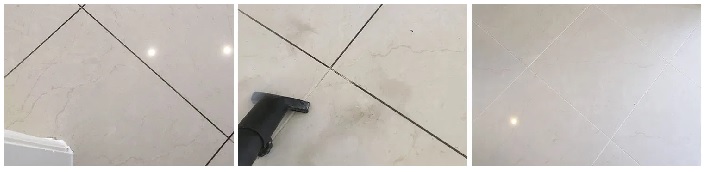
Grout Cleaning

Welcome to my Work History archive where you will find detailed examples of the cleaning and renovation of grout carried out in Lincolnshire

Cleaning and Renovating Grout

The top layer of grout is porous and can absorb grease, dirt and limescale. Spillages such as wine, lemonades or greasy substances will cause marks and patches in the joints in the floor. Grout between wall-tiles particularly in damp areas like bathrooms will become dirty and unattractive as a result of Mould, Mildew and Limescale.

Mould is one of the most unsightly problems, which usually starts off in the wettest area of the room, this could be the bottom of the shower or bath, then starts to spread and if left unchecked could cover a large area of the wall.

Another common issue we find is a problem known as Grout Haze or Grout Smearing where a thin layer of grout has been left to set on the surface of the tile. Once grout has set it is difficult to remove.

Discolouration of grout joints in bath or shower areas due to continued use of acid formulated shampoos and soaps. This causes yellow orange and pink stains to the grout over even a short period of time. Whilst Grout Joints can be cleaned, badly stained grout may need to be re-coloured.

Protecting your grout in advance with a sealer will prevent most of these issues and although relatively unknown in the UK, protection awareness is growing. Sealing forms an invisible barrier between the grout and the surface, this will then protect your investment for years to come.

We have solutions for all the problems listed above and below you will find detailed examples of work we have carried out in the past to resolve many of these issues. It should give you some idea of what’s involved and what can be achieved with the right techniques and products.


Indian Sandstone Kitchen Floor Renovation Spalding Lincolnshire

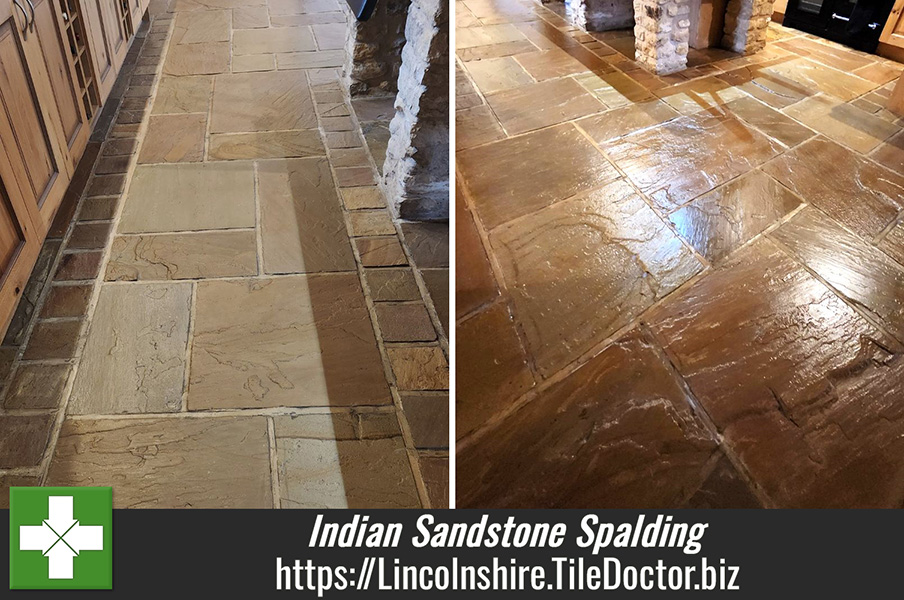
Large Indian Sandstone Tiled Kitchen Floor Renovated in Spalding

A homeowner near Spalding contacted Tile Doctor to restore a large Indian Sandstone floor that had lost its appearance and so the owner wanted it renovating. Covering approximately 130 square metres, the Sandstone had lost much of its original colour and character due to the sealer wearing off which led to the inevitable build-up of dirt, organic staining, and general environmental contamination.

Indian Sandstone Kitchen Floor Before Cleaning Spalding Indian Sandstone Kitchen Floor Before Cleaning Spalding

The customer wanted to bring the floor back to life and protect it from future staining and damage. After inspecting and the tile and grout, I recommended a professional deep clean followed by sealing using Tile Doctor’s trusted Pro-Clean and Seal & Go products.

I worked out a detailed quote to renovate the floor, which was accepted and a date agreed to do the work. Given the size of the floor the restoration project was scheduled over two days. The first day would focus entirely on deep cleaning the sandstone to remove years of ingrained dirt and organic growth and the second on applying the sealer.

Day One – Deep Cleaning Indian Sandstone Tiles

Work began by applying a strong dilution of Tile Doctor Pro-Clean, a high-performance alkaline cleaner specifically designed to break down stubborn dirt, dirty grout lines and other contaminants commonly found on stone surfaces. The solution was allowed to dwell before being worked into the stone using a heavy-duty floor scrubber fitted with a black pad.

The cleaning process lifted a surprising amount of embedded soiling from the sandstone, revealing the natural colours hidden beneath the surface. Particular attention was paid to heavily trafficked areas and sections exposed to moisture and grime was most prominent. Additionally, the grout was hand scrubbed where needed with more Pro-Clean.

Following the cleaning stage, the floor was thoroughly rinsed to remove all residues and loosened contaminants. Once completed, the transformation was already impressive, with the sandstone displaying much brighter and more vibrant tones. The stone was then left overnight to dry completely in preparation for sealing the following day using turbo dryers

Day 2 – Sealing an Indian Sandstone Tiled Kitchen Floor

On the second day, after confirming the Sandstone was fully dry, work started on applying a fresh sealer to the floor. Several coats of Tile Doctor Seal & Go were applied, allowing for thirty-minute drying time between coats. This is a high-quality sealer that will provide long-lasting protection and is idea for natural stone such as sandstone.

Multiple coats of Seal & Go were carefully applied to ensure even coverage across the entire 130m² area. The sealer once applied into the stone, helps to repel water, reduce staining, and make future maintenance much easier. Leaving a satin shine to the whole floor.

As the sealer cured, the natural beauty of the sandstone was enhanced further, enriching the colours while maintaining the stone’s natural appearance. The treated surface was left with excellent protection against general day to day use helping to preserve the floors restored condition for years to come and make it easy to keep clean.

Outstanding Results

The completed transformation was remarkable. What had previously been a tired and dull floor was restored to a clean, attractive indoor living space that once again became a feature of the property.

Indian Sandstone Kitchen Floor After Renovation Spalding Indian Sandstone Kitchen Floor After Renovation Spalding

The customer was delighted with the results and amazed at the difference professional cleaning and sealing had made. For aftercare I recommended the use of Tile Doctor Neutral Tile Cleaner which is a mild yet effective product that won’t impact the sealer.

Indian Sandstone Kitchen Floor After Renovation Spalding

If your stone floor is looking tired, stained, or affected by algae and dirt build-up do get in touch as professional cleaning and sealing can dramatically improve its appearance and longevity.


Professional Sandstone Floor Renovation Service in Spalding

Large Indian Sandstone Tiled Kitchen Floor Renovated in Spalding Read More »

Marble Floor Tile Polishing in Bourne

Dull Marble Tiled Kitchen Floor Polished and Transformed in Bourne

We recently undertook a truly remarkable transformation of a tired and weathered Marble floor at a home in Bourne in South Lincolnshire. Once the pride of the property, the surface had dulled over the years—its natural sheen muted by time, foot traffic, and improper maintenance products.

Dull Marble Floor Before Polishing in Bourne Dull Marble Floor Before Polishing in Bourne

There were no physical issues with the Marble tiles, it was simply a case of the polished appearance being worn down with use, the grout had also darkened with dirt. The solution would be to hone the polish back onto the Marble using a set of burnishing pads, cleaning the grout and then re-sealing to protect the stone from ingrained dirt. I quoted for completing the work which was accepted and a date set.

Cleaning and Polishing a Marble Tiled Kitchen Floor

The renovation began by adding protection to the adjacent carpeting and plinths with silicone; water ingress can cause damage especially to MDF so this step is always worth doing. Once done the floor was given a meticulous deep clean using a rotary buffer to remove surface dirt.

Next, to restore the deep polish and natural beauty to the stone a series of Tile Doctor Diamond Burnishing Pads were run over the tiles in sequence from coarse to extra fine. The coarse pad removes layers of ingrained dirt, residues and fine scratches that mask the floor’s character. Water is used to lubricate the process, and this turns into a dark slurry as the work progresses. Once each tile has been burnished several times with the pad, the floor is rinsed to remove the slurry.

The pads can struggle to reach into the recesses of the grout line so at this point I ran a medium dilution of Tile Doctor Pro-Clean along the grout lines and scrubbed it in with a wire brush to get the dirt out.

After another rinse and extraction, the coarse pad was then changed on the buffer for the first of the three finer pads. These finer pads gradually hone the stone and restore the deep polished appearance. With each pass, the marble reveals more of its hidden depth and clarity. Again, these are applied with water and the floor rinsed and extracted afterwards to remove the slurry.

The last pad is a very fine grade and is applied dry with only a little water using a process we call a spray burnish and leaves the marble smooth with a deep light-reflecting finish.

Marble Floor During Polishing in Bourne

Sealing a Marble Tiled Kitchen

On day two, the Marble was finished with the application of the sealer which for this floor we had decided upon Tile Doctor Ultra-Seal. This is Tile Doctor’s premium impregnating natural look sealer that penetrates deep into the stone protecting it from within.

The sealer occupies the pores in the stone ensuring dirt cannot reside there, keeping it on the surface and thereby providing long-lasting protection from spills, stains, and moisture. With Tile Doctor Ultra Seal, the Marble’s surface was not only radiant but now ready to resist the rigours of daily life.

Marble Floor After Polishing in Bourne Marble Floor After Polishing in Bourne

The result? A floor that shimmered with elegance—its rich shine and warm tones brought back to life, glowing under the natural light like a polished sculpture. The homeowners were overjoyed, and we were proud to have revived a floor that now looks as luxurious as the day it was laid.

For aftercare I recommended Tile Doctor Stone Soap which is a gentle yet effective cleaning product that contains a patina enhancer and won’t impact the sealer.


Professional Restoration of a Marble Tiled Kitchen Floor in Lincolnshire

Dull Marble Tiled Kitchen Floor Polished and Transformed in Bourne Read More »

=================================

Lincolnshire Tile Doctor

================================= Read More »

Scroll to Top