Marble Tile Cleaning

Welcome to my Work History archive where you will find detailed examples of the cleaning and renovation of Marble tiles carried out in Lincolnshire

Cleaning and Polishing Marble tiles

Marble is reputed in the international market for its premium quality, toughness and durability. It is often the preferred choice for interior and exterior in both commercial and domestic situations for flooring, wall cladding, paving, facades of buildings, pavements and landscaping.

One of the main issues with polished Marble is the polish starts to wear down with use and eventually becomes dull. Another issue we see is acid etching where strong unsuitable cleaning products used on the stone etch the surface and ruin its appearance. To resolve both these problems the stone needs to be re-polished with diamond encrusted burnishing pads of different grits to hone the stone and bring back that deep shine. If this sounds familiar you should talk to us about our annual maintenance program where we visit you once a year to clean, polish and seal your floor thus keeping it in top condition.

Below you will find detailed examples of work we have carried out in the past, it should give you some idea of what’s involved and what can be achieved with the right techniques and products.


Marble Floor Tile Polishing in Bourne

Dull Marble Tiled Kitchen Floor Polished and Transformed in Bourne

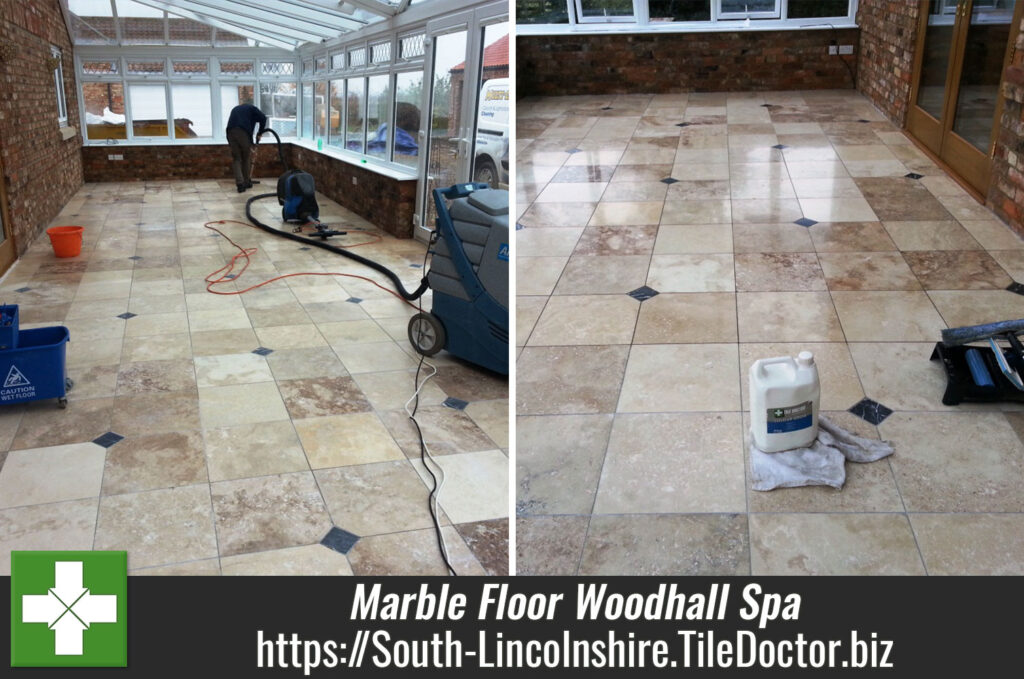
We recently undertook a truly remarkable transformation of a tired and weathered Marble floor at a home in Bourne in South Lincolnshire. Once the pride of the property, the surface had dulled over the years—its natural sheen muted by time, foot traffic, and improper maintenance products.

Dull Marble Floor Before Polishing in Bourne Dull Marble Floor Before Polishing in Bourne

There were no physical issues with the Marble tiles, it was simply a case of the polished appearance being worn down with use, the grout had also darkened with dirt. The solution would be to hone the polish back onto the Marble using a set of burnishing pads, cleaning the grout and then re-sealing to protect the stone from ingrained dirt. I quoted for completing the work which was accepted and a date set.

Cleaning and Polishing a Marble Tiled Kitchen Floor

The renovation began by adding protection to the adjacent carpeting and plinths with silicone; water ingress can cause damage especially to MDF so this step is always worth doing. Once done the floor was given a meticulous deep clean using a rotary buffer to remove surface dirt.

Next, to restore the deep polish and natural beauty to the stone a series of Tile Doctor Diamond Burnishing Pads were run over the tiles in sequence from coarse to extra fine. The coarse pad removes layers of ingrained dirt, residues and fine scratches that mask the floor’s character. Water is used to lubricate the process, and this turns into a dark slurry as the work progresses. Once each tile has been burnished several times with the pad, the floor is rinsed to remove the slurry.

The pads can struggle to reach into the recesses of the grout line so at this point I ran a medium dilution of Tile Doctor Pro-Clean along the grout lines and scrubbed it in with a wire brush to get the dirt out.

After another rinse and extraction, the coarse pad was then changed on the buffer for the first of the three finer pads. These finer pads gradually hone the stone and restore the deep polished appearance. With each pass, the marble reveals more of its hidden depth and clarity. Again, these are applied with water and the floor rinsed and extracted afterwards to remove the slurry.

The last pad is a very fine grade and is applied dry with only a little water using a process we call a spray burnish and leaves the marble smooth with a deep light-reflecting finish.

Marble Floor During Polishing in Bourne

Sealing a Marble Tiled Kitchen

On day two, the Marble was finished with the application of the sealer which for this floor we had decided upon Tile Doctor Ultra-Seal. This is Tile Doctor’s premium impregnating natural look sealer that penetrates deep into the stone protecting it from within.

The sealer occupies the pores in the stone ensuring dirt cannot reside there, keeping it on the surface and thereby providing long-lasting protection from spills, stains, and moisture. With Tile Doctor Ultra Seal, the Marble’s surface was not only radiant but now ready to resist the rigours of daily life.

Marble Floor After Polishing in Bourne Marble Floor After Polishing in Bourne

The result? A floor that shimmered with elegance—its rich shine and warm tones brought back to life, glowing under the natural light like a polished sculpture. The homeowners were overjoyed, and we were proud to have revived a floor that now looks as luxurious as the day it was laid.

For aftercare I recommended Tile Doctor Stone Soap which is a gentle yet effective cleaning product that contains a patina enhancer and won’t impact the sealer.


Professional Restoration of a Marble Tiled Kitchen Floor in Lincolnshire

Dull Marble Tiled Kitchen Floor Polished and Transformed in Bourne Read More »

Mosaic Tiled Floor Before and After Restoration Lincoln College

1880 Mosaic Tiled Floor Fully Restored at Lincoln College

Pictured below are photographs I took recently whilst restoring an original 1880s Mosaic tiled floor at Lincoln College. The floor was 60m2 in size and located in the main entrance of the college. After searching around for someone who could restore the floor back to its original state, they found Tile Doctor and as their local representative I was asked to survey the floor and provide a quote.

Mosaic Tiled Floor Lincoln College Before Restoration

The work would involve removing concrete screed, repairing cracks, filling holes, deep cleaning and then sealing the floor to protect it. Time was a factor as I would only have the space to myself between the end of the summer term and before the freshers arrived at the end of September. Happy to get involved I was pleased to be awarded the work.

Repairing and Deep Cleaning a Mosaic Tiled Floor

Rather than restore the floor a decision had been taken in the past to level it and cover it, probably in some sort of carpet. As a result, my first action was to carefully remove the concrete screed, glue, and bitumen. This was pain staking work as I didn’t want to damage the mosaic tiles hidden underneath. To do this I needed to use a chisel and a set of diamond encrusted burnishing pads fitted to a heavy floor buffer and lubricated with water. Each pad generates a fair amount of slurry which needs to be rinsed off with more water and extracted using an industrial wet vacuum.

Mosaic Tiled Floor Lincoln College During Restoration

With the screed and other coverings removed to reveal the whole Mosaic floor I was then able to move onto deep cleaning up the tiles using a strong dilution of Tile Doctor Pro-Clean which is a tile and grout cleaning product scrubbed in with a black pad. Again, the wet vacuum and more water was employed to remove the dirt and soil generated during the cleaning process.

The appearance of the Mosaic tiled floor had now fully to revealed itself and I was able to move onto the next stage which was to fill in the cracks and holes using a filler coloured to match the tile and grout. I also painted matching colours onto the surface of the cracks and holes to camouflage them and ensure the repairs would match the general pattern of the floor and make the repairs invisible.

Mosaic Tiled Floor Lincoln College During Restoration

Due to the large size of the floor and with other contractors working in the building I worked in cordoned off sections and used an industrial turbo dryer speed up the during times.

Sealing a Large Mosaic Tiled Floor

The main restoration took two days to complete, and I returned for a third and final day to finish the floor with the application of a protective sealer. For this I chose Tile Doctor Colour Grow which is an impregnating sealer that protects by soaking into the pores of the tiles and protecting it from within. This sealer also enhances the natural colours of the tiles making them stand-out better, three coats were applied.

Mosaic Tiled Floor Lincoln College After Restoration

The building managers were over the moon with the transformation and draw quite a crowd from the staff as they came to see the 140-year-old floor renovated to its original condition. Not only did we manage to save this historic part of the building but also save them thousands on a replacement.

Mosaic Tiled Floor Lincoln College After Restoration


Historic Mosaic Tiled Floor Restored in Lincoln

1880 Mosaic Tiled Floor Fully Restored at Lincoln College Read More »

Removing Scratches from Marble floor tiles in Woodhall Spa

Removing Scratches from Marble floor tiles in Woodhall SPA

This Marble Tiled floor was installed in the conservatory of a house in Woodhall Spa who had asked if we could remove the scratches from their inherited marble tiles around the door area and where furniture had been dragged across the tile as shown in the photos. Interestingly our customer is a chief engineer on cruise ships all over the world and knew what this floor could look like if restored professionally.

Damaged Marble Tile Woodhall Scratched Marble Tile Woodhall

Burnishing Mable Tiles

Other than the scratches the majority of the floor had been well maintained so the solution was to burnishing the marble back to its original condition using a set of diamond encrusted pads fitted to a slow speed machine and lubricated with a little water. The burnishing pads come in a set of four and applied to the floor with a little water one by one using a rotary machine running at slow speed.

Cleaning Marble Tiles Woodhall
The process starts with the coarse pad which strips back the top layer and removes sealers and dirt from the surface of the stone. The pads then become finer and finer with the last pad being a final polish that takes the tile back to near it’s originally intended shine. You can see from the photographs that we actually managed to resurface the marble, remove the scratches and we also filled in some small holes and then allowed the floor to dry overnight helped by our turbo drying system allowing for minimal drying times.

Polishing Marble Tiles Woodhall

Marble Tile Sealing

The next day we applied two coats of Tile Doctor Colour Grow sealer to the tiles, the sealer fills the pores of the stone protecting it from stains and this particular sealer also lifts the natural colours in the stone.

Sealing Marble Tiles Woodhall
As you can see the scratches were removed and the tiles now shine and are protected and polished to a stunning finish that the customer was over the moon with and couldn’t thank us enough for the professional and excellent job on time and budget.

Marble Tiled Floor resurfaced and polished in Woodhall Spa

Removing Scratches from Marble floor tiles in Woodhall SPA Read More »

=================================

Lincolnshire Tile Doctor

================================= Read More »

Scroll to Top